Unity 2D Starter Kit Overview


See GitHub README.md for best formatting
Unity 2020 2D Starter Kit
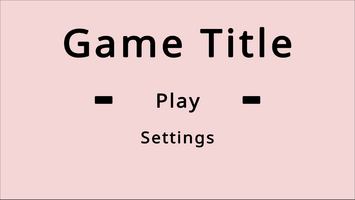
This "Unity 2020 2D Starter Kit" project is designed to help Unity developers / jammers hit the ground running on a 2D game. It contains a simple main menu with the following features:
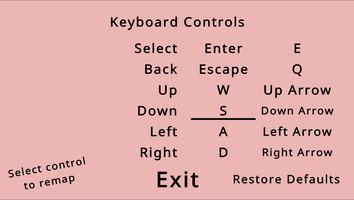
- New Unity Input System configured for mouse + keyboard + gamepad input and remappable controls
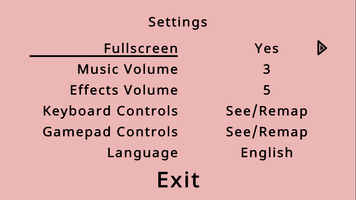
- Player Settings capable of saving preferences for fullscreen/windowed, music volume, effects volume, keyboard mappings, gamepad mappings, and language.
- Audio Manager for playing music and sounds
- Localization Manager for seamless switching between languages
I did my best to provide context about the contents of the starter kit in this README. But this is not a step-by-step tutorial, it is a downloadable Unity Project that can be explored to learn/leverage the tools contained.
Feel free to reach out with questions I am @freebrunch on Twitter.
- Dapper Dino - Key rebinding tutorial for new Unity Input System
- Official new Unity Input System Docs
I used the new Unity Input System for handling player input. It abstracts from specific hardware making it easy to define behavior for any mouse, keyboard, or gamepad regardless of hardware differences.
The new Unity Input System holds mappings in a dedicated Input Action asset found in the Assets/Actions/ folder in either C# or Unity file form. You can double click the Unity file where you can use the GUI to define Actions then map forms of input to them.
In my scene I have a PlayerInput (Singleton) game object with a Player Input component where this Input Action asset is assigned and configured to "Invoke Unity Events". This project has keyboard/gamepad actions defined for:
- Move (Up, Down, Left Right)
- Select
- Back
And mouse actions defined for point and click.
Then I have a PlayerInputHandler (Singleton) game object that listens to the player input events and passes them along to the "Scene Controller" to situationally do what is needed with the input. A "Scene Controller" is a pattern I use to respond to the input differently in each Unity scene.
I have a script called ControlsBindingText.cs that is placed on text game objects in the controls view. Each object corresponds to a different input mapping (select, up, etc.). When one of these mappings is "selected" the ControlsBindingText.cs - StartRebinding() function is called.
public void StartRebinding() { objectText.text = empty; bindingAction.Disable(); if (keyboardDisplayStatus) { rebindingOperation = bindingAction.PerformInteractiveRebinding(keyboardBindingIndex) .WithControlsExcluding("Mouse") .WithControlsExcluding("Gamepad") .OnMatchWaitForAnother(0.1f) .OnComplete(operation => RebindComplete()) .Start(); } else { rebindingOperation = bindingAction.PerformInteractiveRebinding(gamepadBindingIndex) .WithControlsExcluding("Mouse") .WithControlsExcluding("Keyboard") .OnMatchWaitForAnother(0.1f) .OnComplete(operation => RebindComplete()) .Start(); } }
The most confusing part of this script are the bindingId's and bindingIndex's. Essentially for the new Unity Input System every binding for an "Action" has a unique ID associated with it. I entered these ID's from the UI into the public string field in their corresponding ControlsBindingText.cs objects so they remapped the correct Action binding in the Unity Input Action asset. The only way I can get all the bindings on an Action is as an Array so I also track which "Index" in that Actions "Bindings" array each of those Id's matches.
Hopefully the script makes more sense than that paragraph.
The PlayerSettings.cs (Singleton) script has a public reference to the PlayerInput asset that holds the new Unity Input System config.
It leverages the PlayerInput asset to save bindings as Json in string form.
string rebinds = playerInput.actions.SaveBindingOverridesAsJson(); PlayerPrefs.SetString(playerBindings, rebinds); PlayerPrefs.Save();
It then can also override the current PlayerInput asset with a saved config.
PlayerInputSingleton.Instance.gameObject.GetComponent<PlayerInput>().actions.LoadBindingOverridesFromJson(controlDefaultBindings);
My InputAction map of player inputs has simple "point" and "click" actions that pass InputAction.CallbackContext's to my PlayerInputHandler.
My PlayerInputHandler converts the context location to the in game coordinates.
pointerLocation = cachedMainCamera.ScreenToWorldPoint(inputValue);
And then my SceneController determines what to do if that portion of the screen has been "hovered over" or "clicked".
currentSceneController.Point(cachedPointerLocation);
public void Point(Vector2 pointerLocation) { Vector2Int pointAnalysis = Util.ReturnPositionFromMouse(pointerLocation, menuLayer, sceneClickables);
You will see in my SceneController - "MainMenuController" I do "analysis" on the mouse input to determine if any gameObject matches mouse input. For every scene I have every selectable located on a x,y grid with different layers for menus.
Here are some example defined clickables/hoverables on my MainMenu.
// xbounds (left to right), ybounds (bottom to top), layer, row, col // layer 1 private List<float> playButton = new List<float>() { -4f, 4f, -1.5f, 1.5f, 1f, 1f, 1f }; private List<float> settingsButton = new List<float>() { -4f, 4f, -5.5f, -2.5f, 1f, 2f, 1f}; // layer 2 private List<float> musicVolume = new List<float>() { 4.6f, 14.6f, 4.65f, 6.65f, 2f, 1f, 1f }; private List<float> musicVolumeIncrease = new List<float>() { 14.61f, 16.6f, 4.65f, 6.65f, 2f, 1f, 2f };
So I do an analysis on the click location where I take the current menu layer and click location and see if it matches any of my predefined scene clickables. If it matches I can take appropriate action on click or hover.
This is just one simplistic way to handle mouse/touch input that would only work if you have static/unmoving clickables in your scene. But hopefully it can inspire you for creating a system for managing your own mouse input that is adaptable to your design needs.
The PlayerSettings.cs (Singleton) script is pretty self explanatory. It utilizes Unity PlayerPrefs to Save/Load player settings. And contains a bunch of helper methods to retrieve/set those saved settings.
- Music Volume
- Effects Volume
- Language Chosen
- Player Control Mapping
The Audio system is also pretty self explanatory. The AudioManager game object (Singleton) contains 9 Audio Source components. The first Audio Source is dedicated to music. And the subsequent 8 are for sound effects. The AudioManager.cs script on the AudioManager game object is accessed from anywhere to play clips, and it cycles through the array of Audio Sources configuring and playing them. It sets their volume based on Player Settings. It also contains some cached sounds used often.
- Game Dev Guide - Youtube tutorial for script that imports localization csv
- Zolran - Creating TextMeshPro font asset with fallback fonts for different language characters
There are a lot of routes to get dynamic localization for your Unity project. This is a very simple one. This solution takes in a localization spreadsheet. Each column in the spreadsheet corresponds to a different language. And each row is a translation of some text, identifiable by a key in the first column. Make sure that each cell of translation is bookended by quotation marks.
Languages used in this starter kit project
- English
- Spanish (obtained through google translate)
- Simplified Chinese (obtained through google translate)
To use the method in this tool you export your localization spreadsheet as a .csv file and save in the Resources/ folder. The CSVLoader.cs script takes in the spreadsheet and saves all the text in a dictionary with a key for each language.
The LocalizationManager gameobject / script then grabs each key on the CSVLoader and saves the contents in a language specific dictionary.
localizedEN = csvLoader.GetDictionaryValues("en"); localizedES = csvLoader.GetDictionaryValues("es"); localizedSC = csvLoader.GetDictionaryValues("sc");
Now by using the key for the text field you want to get the localized text for, you can query the LocalizationManager to get the string you seek.
public static string GetLocalizedValue(string key) { if (!isInit) { Init(); } string value = key; switch (curLanguage) { case Language.English: localizedEN.TryGetValue(key, out value); break; case Language.Spanish: localizedES.TryGetValue(key, out value); break; case Language.SimplifiedChinese: localizedSC.TryGetValue(key, out value); break; default: localizedEN.TryGetValue(key, out value); break; } return value; }
Every text object in the project has a LocalizedText.cs script assigned that calls the LocalizationManager to get it's text localized to the current selected language.
Handling different language characters
When I first implemented this localization system all of the chinese characters for Simplified Chinese language chosen were displayed as squares. This was because the font asset each TextMeshPro game object was using did not support chinese characters.
I decided to import the Google created "Noto Sans" font via .otf files downloaded from Google Fonts. The "Noto" series of fonts is an initiative by google to create a font family that supports almost all known languages. Find all the Noto fonts in the Assets/Fonts/ folder. I then created TextMeshPro font assets from each of these fonts. Designated the BASE-Noto Sans-Regular SDF TextMeshPro font asset as the font asset for every text object. Then edited the BASE-Noto Sans-Regular SDF asset to designate it's Fallback Font Assets to include all the other Noto family font assets (japanese, korean, etc.) so that if it ever didn't have the language character supported it would search its fallbacks.
I hope this additional context about the project is helpful! I didn't want to dive deep into every possible aspect but rather give a surface level overview to the tools presented by the starter kit.
Hope this project helps you in some way!
Cheers, Ben
Files
Get Unity 2D Starter Kit
Unity 2D Starter Kit
Designed to help Unity devs / jammers jumpstart a 2D game
| Status | Released |
| Category | Assets |
| Author | Ben Thomas |
| Tags | 2D, Unity, unity2d, unity-kit, unity-tutorial |
Leave a comment
Log in with itch.io to leave a comment.